A Mother Never Stops Loving

There is anticipation for a sweet baby,
Days go ’round and ’round and

We have a small portion of our acres set aside for our family burial ground. I have a living fence of Iris, in shades of purples and yellows with a few snowy-whites scattered between. All the rhizomes have been passed to me from family and dear friends. The field is sown with Ox-eye Daisies that bloom every year around Mother’s Day.

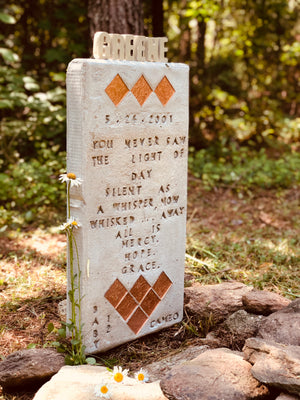
We had a small pile of river rock on our teeny-tiny baby’s grave but I really wanted to put up a memorial stone.

The idea came to me when one of my sons put one of the concrete pavers they had helped Roger make for our porch floor on our beloved dog’s grave, wrapping the square stone with his collar. I knew then I would try to make my own headstone.
Make-It-Yourself Grave Marker
Here is how we did it:
- Build a wooden form. I used a heavy cardboard box lid that was about the size I wanted for the headstone. My talented carpenter boys used wood to frame the box lid. My son helped me saw 4 wood boards 3 inches wide and screwed them around the outer edges of the cardboard box to make a sturdy form. We used wood screws to hold the form together.
- Drill 2 holes in the end piece and insert 2 lengths of rebar at least 18 inches long. Leave at least 12 inches of the rebar on the outside of the form—they will be the stakes holding the finished marker to the ground.
- Mix up a bucket of ready-mix concrete with water to a workable consistency. QUIKCRETE is a well-known brand that is a blend of masonry cement and graded sand. You only need to add water.
- Line the form with heavy plastic, allowing edges to come out over the top. For easier removal of outer form, rub down plastic with recycled motor oil.
- Pour in concrete mixture, smoothing with trowel and leveling off the surface.
- When surface water is absorbed, press in decorative tiles as desired.
- After about 45 minutes, the mixture should be firm enough to stamp name, date, and epitaph with concrete stamping stencils. If the mixture is still too wet, the design will not hold. Simply press mixture back and smooth it with your fingers and try again in 15 minutes.
I allowed my finished cement grave marker to dry for 1 week in the sun. Then we carefully removed the outer frame. I used E6000 adhesive to attach the concrete handmade letters to the top. We allowed it to cure without the frame for another 2 weeks before placing on the grave. You will be able to tell from the color of the concrete that all the water has evaporated and it has hardened thoroughly. Use a concrete sealer as desired.


Stencils I used for lettering pressed into concrete.

HELPFUL TIPS
♦Place the prepared form on a flat level surface before filling with concrete mixture.
♦Place form at a comfortable height to work on it—pressing the letter/number stencils into the concrete is time-consuming.
♦Sketch out your wording on a piece of freezer paper or newspaper cut to the size of your grave marker.
Concrete letters used for top of headstone can be purchased ready made from Etsy or made yourself using this mold.


I love creating remembrances with meaning and with love. Drop me a comment on how you remembered your special loved one that is now gone.
- Martha Greene
Comments 0